Great news!!!
With the announcement of Xcode 7 by Apple, they are now allowing anyone to be able to have a free developer account (no more paying Apple $100/yr). The only downside to the free account is that you can only add the program to devices that you physically have.
Follow the instructions below to re-sign my unsigned IPA and successfully install it on your iDevice.
Requirements:
- Apple ID Account — https://appleid.apple.com/
- Apple Computer (Running OS X via a virtual will also work)
- macOS High Sierra on VMWare (I recommend the VMWare one since I was able to successfully passthrough the iPhone from my machine to the virtual. VirtualBox was not passing through my iPhone 7 Plus but should work for iPhone 6s and lower. Also note– I created a NEW AppleID to login to the virtual since I did not create it, I get paranoid and don’t know if it has any kind of malware and I was not going to risk my real account)
- Xcode 7 (or greater)
- iReSign (El Capitan or earlier) — https://github.com/maciekish/iReSign
- iOS APP Signer (macOS Sierra or newer) — http://dantheman827.github.io/ios-app-signer/
- nzbUnity unsigned IPA — download link below
- Any Xcode project — You will modify the bundle identifier so make a backup if it’s a real project (Sample: https://github.com/jasarien/Provenance/archive/master.zip)
nzbUnity v1.8.133 beta
Posted: November 15th, 2020
CHANGELOG
- (ADD) Sonarr: Multiple Sonarr support.
- (ADD) Downloaders: NZBGet (only for now). Ability to perform action on multiple items (pause/resume/priority/etc)
- (FIXED) Settings: In some cases, nzbUnity would fail to get the APIKEY for Radarr and Lidarr.
- (FIXED) Search: When using the ‘Search All’ method, in some cases, nzbUnity would send a NULL link to the downloader.
- (FIXED) Downloaders: Attempting to filter ruTorrent’s queue would result in nothing being found.
- (FIXED) Sonarr: Unable to change the quality of the show if running Sonarr v3
- (CHANGE) All: Images are now being stored into their respected ({app}\Documents\Multimedia\{applet})
- (CHANGE) Downloaders: Filtering the queue list will now update the items while in filtered mode.
- (CHANGE) Sonarr: Removed the menu bar when viewing a series and added options page. In options, can now manage episode (change quality/language), search monitored, refresh & scan, change quality, type, etc.
nzbUnity v1.8.125
Posted: May 18th, 2020
CHANGELOG
- (ADD) Ombi: Ombi Support.
- (ADD) Downloaders: rTorrent(ruTorrent) support.
- (ADD) Settings: Application Theme (Top nav bar matches color of app now).
- (CHANGE) Pro: Features are now available to all.
- (CHANGE) Settings: Settings has a slightly newer look for adding apps / misc menu
- (FIXED) Downloaders: Clicking on History would crash the app if a torrent client on the list (most torrent clients do not support history)
- (FIXED) Downloaders: (iOS 13) NZB uploading to the default client from Downloads folder (now part of the iCloud Drive). Depending on the resign method, import of NZB will still fail (working on resolving it fully).
- (FIXED) Sonarr: If tv show had no poster and on the 3 poster per row, nzbUnity would make the show unclickable.
- (FIXED) Downloaders: In Deluge, if the password contained special characters, the password escape would make it so that nzbUnity could not connect.
- (FIXED) Search: In certain cases, Jackett links would fail to send to the torrent download client or crash nzbUnity.
- (FIXED) Pin: If pin was enabled and FaceID was enabled on the device (those without fingerprint reader), app would crash
- (FIXED) Lidarr: Lidarr would fail to connect in some cases due to improper parsing of the init file.
XCODE
Xcode is an integrated development environment (IDE) containing a suite of software development tools developed by Apple for developing software for OS X and iOS. Although it may seem like a complicated program, it is actually quiet simple and we only need it to generate our mobile provisioning profile. You only need to do the Xcode section once — the goal is to use a non-expired profile with the name com..nzbUnity for your current iDevice. If the profile has expired, you don’t have a profile, or you want to use another device, then you will need to do this section
Click on Xcode menu and then on Preferences
Click on Accounts tab
Click on the + on the bottom left and enter your Apple ID (this will create your free developer account — noted by the PERSONAL TEAM label)

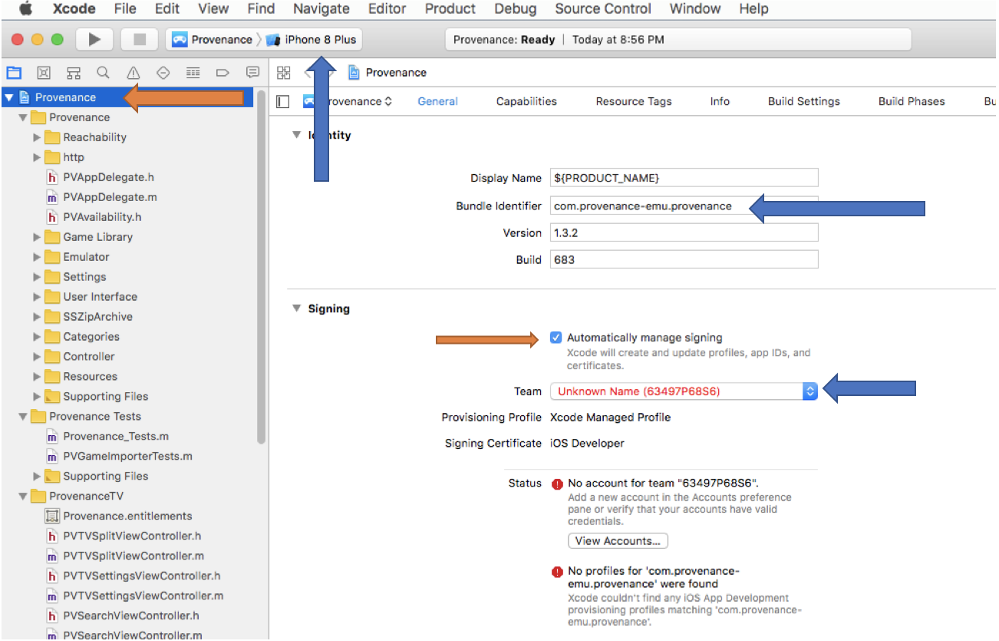
Click on General tab
Update the following:
- Change the Bundle Identifier to com.<any unique name you want>.nzbUnity (ex: com.asdjflajf.nzbUnity)
- Change the device from one of the simulators to your device (your device should be plugged in); in this screenshot, the simulator was for an iPhone 8 Plus
- Make sure the Automatically manage signing is checked
- Change the Team to match the team (Apple ID) you want to use

Re-Sign via IOS APP SIGNER (macOS Sierra)
iOS APP Signer is an app for OS X that can (re)sign apps and bundle them into ipa files that are ready to be installed on an iOS device. It is very similar to iReSign
Open iOS App Signer
For the ‘Input File‘, select the unsigned ipa
‘Signing Certificate’ – select your certificate
‘Provisioning Profile’ will be the profile name from Xcode
Click on Start and the app will ask you where you would like to save the signed IPA to.

Please see below for a quick video tutorial.
Add via iTunes | Add via Xcode
ITUNES
iTunes is a media management software created by Apple, Inc., for both the Macintosh and Windows operating systems. We are going to use it to add the ipa to the iDevice.
Note: When adding the newly signed ipa to your iDevice, please use the same computer you’ve used in the past to sync. If you do not, you run the risk of erasing contents from your iDevice.
Open iTunes (if it does not open)
Click on your iDevice icon
Select Apps
Click Install for nzbUnity
Click on Apply/Sync


XCODE
Click on the “Windows” menu and then choose “Devices”


On the right hand side, in the section “Installed Apps“, click on the + and select the resigned IPA

Troubleshooting
Having trouble with any of the steps? Please follow some of the troubleshooting steps. If you are still having issue, please contact me via the contact form.